How to Show Blogger Links,Widgets in HomePage Only or Post Page Only

How to Show Blogger Links,Widgets in HomePage Only or Post Page Only

This post explains how to show the Blogger widgets( like links,adsense ads,etc) on your blogspot blog Homepage Only or Post Page Only:

Usually, by default.. when we add a widget item like link units, profile, Archives, Adsense ads,Pictures,etc in Blogger blog , it will be displayed in every page of the blog including the homepage, Permalink pages,etc. As you can see, I installed many widgets in this blog in sidebars like Google ads, Donate Me button ,etc which will be displayed in all the pages of the blog.
But, what if you want to display a specific widget like a blog link,ads in only the homepage and not in the post pages and viceversa? If you want to do so, this tip will come in handy...

HOMEPAGE Only widgets,links in Blogger:

→ As usual, if you want to add a new widget/gadget to your blog, just Sign into Blogger dashboard » Layout » Add a Gadget
and select the type of gadget you need and Save the Changes.

Next, we have to add a small piece of code to that widget, so.. it only displays in the Homepage. Just go to Edit html and tick on the 'Expand Widget Templates'.
Notes: Normally, the widgets in the template view starts with this one


For example, The label widget looks something like this:


and html widget looks like:


and link list looks like this:


(If you want to know exactly what the widget id you need to change, just go to your blog and view the source code and find it.
In Firefox : View » Page Source
In IE : View » Source )

Just below that widget id link, You can see a b:includable tag like this..


At this point, most of the task is completed.. Just we have to add a small piece of code below that b:includable tag..

the code is


and the last thing is, we have to close that b:if tag. Just add this code before the closing tag of b:includable.
Like this:


So, the final code looks similar like the below screenshot:

That's it! and Don't forget to Save the Changes.
Now, your desired widget/gadget can only be visible in Homepage.

Showing in only Post Pages (Permalink pages):


This will allow you to show a specific widget in only the Post Pages and not in the Homepage.
Just follow the same tutorial above but replace this code.

with this one:


Showing Widgets on a Specific Blog Post url:


If you want to dispaly a specific widget on on a particular blog post, just simply follow the above tutorial, but replace this code:

with this one:


That's it!
Like this post or have any questions? Comment here..

Get Free One Way Backlinks to your site

Get Free One Way Backlinks to your site

One way backlinks are very critical to any website success. The more one way backlinks pointing to your site, the more your Google Pagerank and the more amount of traffic you will get. This should also increase your sales,etc.
But the thing is.. getting the right and quality one way backlinks from high pagerank sites is not an easy task, and in this article, we'll find out some of the best ways to get free one way backlinks:

1. Try to write as much quality content as you can... that will encourage the readers to link to your site. The more useful, informative content you post, the more likely people are to link it. But, this method can take a while to really pay off because like all the new websites, you don't get much traffic.

2. Write quality articles and submit them to top article directories like ezinearticles and goarticles. The advantage in this is, you'll not only get a backlink from high pagerank directories, but also you'll find that your articles are used on other people's sites with a backlink to your site.

3. Participate in forums,discussion boards that are related to your website's niche and add a link to your site in the signature. Make sure that you write quality posts, don't spam. This will also help you get some decent traffic to your site.

4. There is absolutely nothing wrong to get a backlink from a related blog post you decide to comment on. This is one of the effective way of one way link building especially if you comment often on blogs. Comment on blogs related to your niche with a link back to your site as your signature.. and Again, make sure you never spam.

5. Submit your site link to major, well known web directories. Getting listed in directories related to your site not only bring you tons of targetted traffic, but will also improve your search engine rankings. Some of the popular directories to get listed in are DMOZ directory and Yahoo directory. You can submit your link to both paid and free directories and they worth your time.

Resetter Canon IP 2770 "error number : 5200"

This time we will discuss Blink 13x Orange on the Canon iP2770. This incident may be quite confusing for who have never experienced it. OK just go to the scene ...


Early indications:
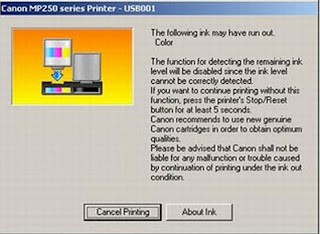
When the printer is turned on seems OK, but after the print command, it would appear Blink iP2770 Canon 13x Orange on this. Here's a picture which appears on the screen:


How to Cope with iP2770 Canon 13x Orange Blink:

1. If performed Blink 13x Orange with the picture above, means catrid color requires reset (having runout).

2. How: press the Resume button until the printer sounds a long process, then release.

3. If an Orange Blink 13x, meaning black catridge also need a reset (having runout), and the picture is as follows:


4. Same way: press the Resume button until the printer sounds a long process, then release.

5. Done, printer iP 2770 distinguished Blink 13x Orange will return to normal.

This often happens when the cartridge runs out finished refilled and then installed again.

For "error number 5200"


There are two ways: manually or via software.

Manual:

1. The printer is turned off and plugged the power cord.
2. Press Resume button 2 seconds
then press the POWER button until the green light on (when pressing the POWER button, Resume button ... do not released first)
3. Then release the RESUME button, but do not release the POWER button.
4. While the POWER button is still depressed, press the Resume button 5 times. Led will light turns green orange with the last glow orange. (Do not be mistaken 4x because the printer will die completely, but it is temporary too) Then ...
5. Release both buttons simultaneously.
6. Led will blink briefly and then will glow GREEN.
7. Press the POWER button, then the printer will die.
8. Press the POWER button again then the printer will flash and ... IP2770 Printer is ready for use.


Software:

1. Prepare 2 blank paper in the printer
2. In the menu "Clear Ink Counter" click "Play" and "Platen"
3. Click Test Print ... Done.

Location resetter software is below.

Good luck ...


User Manager Mikrotik


Mikrotik User Manager is a management system that can be used to manage users as follows:

1. HotSpot users
2. PPP (PPTP / PPPoE) users
3. DHCP users
4. Wireless users
5. RouterOS users.

This paper reviewed some of the User Manager for hotspot users. Previous hotspot and dhcp server package should have installed / enabled and configured prior to Mikrotik RouterOS. The assumption in this paper consists of a WLAN RouterOS and 1 ether. Ether as an interface that is connected to the internet while the wlan as an interface that connects to a hotspot client.Ip 192.168.0.40 ether and wlan 1 with ip 172.16.0.1/24. The steps are as follows:

1. Set the DHCP server on interface wlan1 (Set DHCP server on the previous posts).
2. Set Hostpot
/ Ip hotspot profile set hsprof1 use-radius = yes
3. Set the Radius Client for the User Manager to handle hotspots
/ Radius add service = hotspot address = 172.16.0.1 secret = 123 456
For the record first authenticate hotspot users will read on the database / ip hotspot user print. Remove the data in this directory for authentication on radius.

4. Install the User Manager

- Open system Winbox or packages from terminal

/ System / packages / print
- If no user package manager to install first. Because the user-manager is a separate package from the router os MT. Make sure the outer version of the same OS user version of the package manager. For example if we os router 2.9.50 then user-manager package should also be 2.9.50.
Download from http://www.mikrotik.com/download.html, select one user-manager package from the package zip-2.9.x.npk
- Upload via FTP program to Mikrotik Server
- Reboot Mikrotik Server
- Check system, packages such as No. 1, if the user's active managers have not turned on first and then reboot. If you have active
- Open http://192.168.0.40/userman
- If it can open the user manager login page, it means the user manager is already active.

5. Create a User Manager On behalf of Subscriber
/ Tool user-manager customer add login = "admin" password = 123 permissions = owner
6. Create Hotspot Router
/ Tool user-manager router add subscriber = admin ip-address = 172.16.0.1 shared-secret = 123 456
7. Create a User to Hotspot
/ Tool user-manager user add username = rio password = 123 dawn subscriber = admin

Please try to conn hotspot with a laptop and User Manager can be accessed via http://192.168.0.40/userman. The menus contained there in, among others, login status, add users, delete users, log and others. Such complete http://wiki.mikrotik.com/wiki/User_Manager/Customer_page

Website translator with flag countries

Blog Tips and Trick will discuss about how to install the Translator widget complete with a picture of the flag of each country. Probably most of the bloggers already know how to make or install this Translator widget. but what of the bloggers is a beginner like me, maybe some of the bloggers is a beginner like me still need tips like this. I think this widget is very important also to be installed on the blog page. but can to decorate the blog itself will also be extremely helpful for the visitors. especially for visitors from overseas who are not familiar with the language used on our blog. for the appearance of the widget is something like the image below.


Translator widget that you see as in the example picture above, the form will display its flag march elongated when we put it in part as the header, navbar and the like. because forms appearance of the widget itself will follow the hall from where the widget itself. for example, this widget you put on the side bar of your blog. the form of this widget will not elongate, but will form part of the width square. depending the side bar.

Without the need to talk again swapped, for those of you who are interested in installing the widget translator plus 34 this flag. way is as follows.

1. You login to blogger, then go into the menu layout / layout>> page element.
2. Add a new gadget by clicking the add a gadget by selecting the gadget HTML / javascript.
3. The next step is, you copy all existing code below.


Mikrotik Bandwith control on ADSL link

Mikrotik Bandwith control on ADSL link

I used the MikroTik / RouterOS as my gateway to the Internet. It servers as a PPPoE-client (as my ISP uses PPPoE over ASDL), a router and AP. It does the job perfectly, but with a range of different clients connected, some more "important" that other, and a relatively slow internet connection, I want to shape and prioritize the the traffic going to and from the internet.

Since the ADSL modem has a small buffer and a tendency to slow everything down when it's full, the MikroTik must never send more than about 95% of the up- and download-speed of my line. After some bandwidth-test I figured out I had a real speed of 5660/563. Using that, I started with the challenge of limiting the data-traffic.

Download artikel here
Mikrotik Hotspot Introduction

Mikrotik Hotspot Introduction

HotSpot is a way to authorize users to access some network resources, but does not provide traffic encryption. To log in, users may use almost any web browser (either HTTP or HTTPS protocol), so they are not required to install additional software. The gateway is accounting the uptime and amount of traffic each client have used, and also can send this information to a RADIUS server. The HotSpot system may limit each particular user's bitrate, total amount of traffic, uptime and some other parameters mentioned further in this document.

The HotSpot system is targeted to provide authentication within a local network (for the local network users to access the Internet), but may as well be used to authorize access from outer networks to access local resources (like an authentication gateway for the outside world to access your network). It is possible to allow users to access some web pages without authentication using Walled Garden feature.

Download Manual Mikrotik Hotspot Introduction

Mikrotik Hotspot Setup


The MikroTik HotSpot Gateway provides authentication for clients before access to public networks .

HotSpot Gateway Setup:
- different authentication methods of clients using local client database on the router, or remote RADIUS server;
- users accounting in local database on the router, or on remote RADIUS server;
-walled-garden system, access to some web pages without authorization;
-login page modification, where you can put information about the company;
-automatic and transparent change any IP address of a client to a valid addres.

Download

HotSpot Profile
Hotspot server profiles. There may be various different HotSpot systems, defined as HotSpot Server Profiles, on the same gateway machine. One or more interfaces can be grouped into one server profile. There are very few settings for the servers on particular interfaces - most of the configuration is set in the server profiles. For example, it is possible to make completely different set of servlet pages for each server profile, and define different RADIUS servers for authentication.
Download

HotSpot User
This is tutorial, where client's user/password information is actually added, additional configuration options for HotSpot users are configured here as well.
Download


HotSpot Walled Garden
This is tutorial, where client's user/password information is actually added, additional configuration options for HotSpot users are configured here as well.
Download
How to add a PAYPAL DONATE button

How to add a PAYPAL DONATE button

Adding a Paypal donation button to your blog will give your loyal readers a chance to support(encourage) you by donating a few bucks.
If you don't have a paypal account yet,.. you can get a Free Paypal account here.

so,let's see how to put a Paypal donation button in your blog...


1.First,Log in to your Paypal account.
First,Log in to your Paypal accoun
2.Click on the 'Merchant Services' tab (see at the top of the page).

Click on the 'Merchant Services' tab (see at the top of the page)
3.Scroll down the window and you will see an option "Donations" in the right sidebar.Click on it!
Scroll down the window and you will see an option

4.Now,you will see some options like Donation name/service ,donation id,etc etc...
The first field (Donation name/service) is the only thing that is required and all the remaining fields are optional.
Enter that first field,choose a button style,scroll down the window and click on "Create a button Now"
click on

5.Now,you will see some html code... Copy it and sign in to your blogger dashboard »» Click on the layout »» Add a Page element »» html/javascript »» and paste that html code and SAVE THE CHANGES.

Here is how the button will look in your sidebar

NetPersec TCP/IP Accelerator

NetPersec TCP/IP Accelerator

Accelerator program is arguably good enough ... with the features it has .. and simple setting that can suck the bandwidth exceeds the available capacity. It has been proved by the author of bandwidth capacity available "only" 512Kbps, with this program are able to download with 2x speed .. The program is very helpful for the for the Pengoprek to the needs of the download. Here are the authors attach the downloads that reach 1.2Mbps even more than that, Max download only 2.2 Mbps. In addition, this program has a capacity of only 400kb only. Please adjust your settings as shown below after you download the program links them ....

fitur1

fitur2

fitur3

This program can be downloaded at in here.

Congratulations mengoprek Bozzzz ... ... ..
by tamampapua

Create Dota in Mikrotik


DOTA is one of the Warcraft games for the online version. gamenet games on this is the best-selling games in addition to other online-games games like ragnarok, sealonline, pangya, deco and much more. in addition to these games for free, aka nda pake pocer, also very fun dimaenkan. Here I am trying to write about how to create DOTA in mikrotik machine.

Follow these steps:


-ip firewall nat add chain=srcnat action=masquerade out-interface=Public

-ip address add address=202.xxx.xxx.xxx/32 interface=Public (xxx filled according to your public IP)

-ip firewall nat add chain=dstnat dst-address=202.xxx.xxx.xxx action=dst-nat to-addresses=192.168.***.*** (*** completed according to the local IP who want to create games)

-ip firewall nat add chain=srcnat src-address=192.168.***.*** action=src-nat to-addresses=202.xxx.xxx.xxx

In order for a client who joined in a LAN or a single network can play together add the command:

-ip firewall nat add chain=dstnat dst-address=202.xxx.xxx.1-202.xxx.xxx.254 action=netmap to-addresses=192.168.***.1-192.168.***.254

-ip firewall nat add chain=srcnat src-address=192.168.***.1-192.168.***.254 action=netmap to-addresses=202.xxx.xxx.1-202.xxx.xxx.254

Until this has been successful, but in fact there is a problem I faced, which can not be my proxy machine or remote access from outside the network and other problems, SNMP port ketutup bandwagon, so to display the traffic cacti so blank ... anyone can help

Fix Dota Mik

Previously I've written about Dota Create Rules in Mikrotik, but there are constraints as rules enabled then routerbox not be in a remote, diping can not even display the graph MRTG / Cacti.

After a few times to try and find literature from google finally see the rules that are suitable for a remote interest from outside the network, can ping and of course I could see a graph bandwidth usage via MRTG / Cacti.

Rules like this:

ip firewall nat add chain=dstnat dst-address=202. x . x . x protocol=tcp dst-port=6113 action=dst-nat to-addresses=192.168. x . x to-ports=6113

ip firewall nat add chain=dstnat dst-address=202. x . x . x protocol=udp dst-port=6113 action=dst-nat to-addresses=192.168. x . x to-ports=6113

ip firewall nat add chain=srcnat src-address=192.168. x . x protocol=tcp src-port=6113 action=src-nat to-addresses=202. x . x . x to-ports=6113

ip firewall nat add chain=srcnat src-address=192.168. x . x protocol=udp src-port=6113 action=src-nat to-addresses=202. x . x . x to-ports=6113

ip firewall nat add chain=srcnat src-address=192.168. x . x -192.168. x . x action=netmap to-address=202. x . x . x -202. x . x . x to-ports=0-65535

Probably already know a lot about the rules above, I hope the above rules can be used anyone who needs it, because from experience that there is indeed difficult to find literature or googling about the rules create dota in mikrotik.
hopefully help.

taken from http://harrychanputra.wordpress.com
Read more function

Read more function

If you feel your views on the blog post too long so that makes full view on the main page of your blog, then you can shortly so as not to meet the home page blog and also to tidy up and beautify the appearance of your blog.
By installing scripts read more or learn more, with automatic appearance can make a long your posting be seen a half on the main page of your blog. And will appear type read more ...
under your posting which when clicked will open a full whole your posting.
Now follow these steps to make it :

1.Go to Layout menu and then select Edit HTML
2.Checked cekbox the "expand widget templates"
3.Click Ctrl F to open search box

4.Copy n Paste following code into the search box

You can change the text to be read more read more or with yours creation own ..
6.save edits
7.Then select the Settings menu and select the format
8.in the Post Template box, enter the following code:

9.Then Save.
10. When posting, there are 2 tabs option, the "Compose" and "Edit Html", select
the "Edit HTML", then the code will automatically appear as follows:

Place the post or article that will appear the main page (before the words "Readmore") above this code: while the remaining place amongst the entire post

code and

Good luck ...
How to backup your "Widgets"

How to backup your "Widgets"

Be like my promise at my previous post that is i will posting how to backup the data in the widget / page element.

If emerging question do we require to back up the data in page element? the answer is very require to. Because if you change your old template with new template, hence the data in page element will follow to be vanished, and you'd lose all data be like : guest book, blog accessory, blog tool, and also all which have been attached in your blog forever.


Many the way to back up the data in Widgets / page element, but i'm limitation of time to comment it in detail, hence I will try explain just two way, that is backing up directly from Page element and also backup from template source code.

• Back up widgets From Page Element

Back up widgets in this way be in fact very disturbing, however than we lose various accessory and also tool which have been attached, wiser likely to do so.

Please follow the steps below :
1. Login to blogger with your ID

2. Click Layout.

3. Click menu Page Elemet, you will see the page be like this ( just example):


4. At representative of above seen the article edit which I give red circle, You must click at Edit in each the page element, hence will emerge popup window figuring in the code have in input to that. Pay attention the picture below :


5. Copy the code inside there, and paste to Notepad.

6. Repeat the step above at all the elements.

7. Finish.


There is the step how to back the data inside page element. This is the other way to backup your widgets.

• Back up widget through Template Source Code
I think this way is more quickly and efisian, you need a few time to do this. This is the steps :
1. Visit your blog address.

2. After you at your self blog, click the menu View at the bar menu. See the picture below :


3. After click the menu View, will be out the sub menu, then click Source.

4. if your browser is Internet Explorer, so there is automatically will out the notepad with your template source code. If your browser is Mozilla Firefox or Opera, so there is out the new page with your template source code For example, see the picture below :


5. Save your template source code.

6. Finish.


If your question, where is the widgets code? there is always begin with :

And in terminating with code :


For example, in my template source code. there are code be like this :


So, my widget code is like this :


I hope with this post you become know how to backup your widget template. So, if you want change your template with a new template. Please don't forget to backup your template and your widgets too.

See you in my next post.

How to change the template

How to change the template

At this opportunity, I will discuss about how to change template in blogger.com. First matter to be in considering in changing template is you have to make a backing up your old template, this good for if you feeling not match with your newly template. if you not yet known the way to back up template, please read at the post how to backup template, and also don't forget to back up your widgets (this is very important). For back up your widgets, please read at the post how to backup your widgets.


To change the template, of course you must had a new template to uploaded. If still not yet had, you can download for free template at Bloger templates or at other sites. Have ready for changing your old template with newly template? Please follow the steps below :

1. Login to blogger with your ID

2. After entering the dasboard page , click Layout.

3. Then click edit HTML tab

4. Click the Download full template link. Save your template:

5. Click browse... button. Choose your new template. and then click Upload button.


browse button image

6. Usually go out commemoration that your data in your widgets will be delete forever (so don't forget to backup your widgets).

For example, the image will show like this :


7. Click at Convirm & Save button.

8. Finish. Please look he result.


Now you have had the new face. However of course your template is still empty, So next step is inserting your widgets manually through page element menu.

Enjoy your new blog face.
Tutorial in creating blog in Blogspot

Tutorial in creating blog in Blogspot

1. What is Blog?
Blog is short for "Web log", which is a a web application containing note or writing that are usually called "post" and displaying on the web pages. The posts are often displayed orderly based on the age or based on the time when the writing is written and published, so when you view a blog, you will first find the latest posts, top to bottom of the web page and the first to the last page, if the blog has had more than one web page.
For the first time, blog was created as the online private notes, but along with its development and popularity, blog has various types of contents or writings such as tutorial (e.g. this blog), sharing, business, etc. In general, blogs seem not to have the difference with the sites on the Internet.
The blog platform or used to be called blog machine has been created in such a way by blog designers or developers in order to be user friendly, so the knowledge of HTML, PHP, CSS, etc that was a must to create a web application, now with blog, everything is so easy as 1, 2, 3.
2. How to create blog in blogspot

One of the free blog providers that is quite popular today is blogspot or blogger, where you have to register through blogger.com and you get the domain name as sub domain of blogspot, e.g. yourname.blogspot.com.
Why should you create blog in blogger.com, not in other free blog providers? Actually, there is no “should”, but blogger.com has more advantages than other providers do. One of the advantages is the easiness in operating so that blogger.com is good for the beginners. Other advantages are the freedom in editing and replacing the templates to make the best display, custom domain which means that you can replace the domain with your own but with the blogspot hosting, e.g. yourname.blogspot.com can be changed into yourname.com, but still in the same hosting, i.e. the free blogspot hosting.
It should be emphasized from the beginning that the Internet is highly dynamic, so it is very possible that this practical guide to create blog in blogspot will not be relevant anymore as changes occurring, whether to the platform, coding, or anything else that you see right now in blogger.com
To reduce something unneeded to write, below is how to create blog in blogger.com.
Creating Email
One of the conditions required in creating blog is to have an active email address. If you do not have an email, please register at gmail. Since Blogger is one of Google services, when you want to register at Blogger, you had better use Google Email or gmail. If you need a simple guide to create an email, please use Google search engine to search for the best guide.
Sign up for a blog at blogger
1. Please visit http://www.blogger.com
2. After registration page open, go to the right bottom of the page where you can change the language to your own to make you easier to understand the instructions, but in this tutorial, I use English for more global targeting. Please login by using your username and password of your gmail (your email account is allowed to use for login to blogger).

3. Click "CREATE A BLOG" button
4. Enter your Blog Title in the field next to "Blog Title", and your expected blog address in the field next to “Blog address (URL). Need to remember that when you enter your expected blog address, you have to be sure of it as you cannot replace it in the future, except you use Custom Domain facility. Check for the availability. If your expected blog address is not available, replace with your new one and so on until you get it. Then type the character you see next to "Word verification", below blog address point and click CONTINUE for the next steps.

5. Choose a starter template, meaning that you can replace this template in the future and then click CONTINUE.

6. You will see "Your Blog has been created!" meaning that now you have a blog and you are ready to start Blogging, by clicking "START BLOGGING".

7. You will soon be in the post editor, where you can write anything as you may have thought about before. (it is recommended to directly write for your first post to avoid "Blogger Anti-Spam Robot" that can result in your blog locked. For instance, you can write a very short entry if you have not prepared an entry: "Hello World!", and anything else you want. Click "PREVIEW" button to view how your post will be displayed, then click "PUBLISH POST" if you want your entry to be published.
8. Click "View Post" to see your blog. Below is the example of the blog display created
9. Done

IP Address Tracer

IP Address Tracer

For my friend who likes to be accessory blogs, there's more as an accessory toolsekaligus blog nih blog. This tool serves to track the IP address (Internet Protocol), the visitors of our blog. In addition to the IP address, this tool also can track your browser and operating system used by visitors.

To obtain this tool, my friend can get it at many sites on the Internet. To avoid confusion searching, I take the example of one of them is http://www.ipnow.org. One example of which is owned view this site are as follows:


Interested in installing this? Please follow the steps below:
1. Please open the site http://www.ipnow.org

2. Under the heading Custom Image is a view that can be selected. Take for example: click the Custom Graphical Image Info

3. Choose a backround color and text color desired by pal

4. Click the Create My Image

5. Wait a while until the process is complete

6. Copy the code under the heading Linked Image, paste in notepad for later in the input to the blog

7. Please close the site


For how to enter the code in the copy before, please follow the instructions!

For classic template:
1. Sign in blogger

2. Click the Template menu

3. Click the Edit HTML

4. Copy the entire code of your template, then paste in notepad, please save used for data backup

5. Copy the code in notepad and paste in place of a buddy want

6. Click the Preview button to see changes

7. If it is OK, click Save Template Changes

8. Done.


For a new template:
1. Sign in blogger

2. Click the Layout menu

3. Click the Element menu page

4. Click on Add a Page Element

5. Click ADD TO BLOG in HTML / javascript

6. Copy the code in notepad, then paste in the fields

7. Click SAVE CHANGES

8. Move the new elements that made the place a buddy want, and click the Save button

9. Done.
Artisteer, The Automated Web Designer

Artisteer, The Automated Web Designer

Artisteer is the first and only Web design automation product that instantly creates fantastic looking, unique website templates and blog themes.wordpress themes Design awesome blogs and cool web templates in minutes wordpress themes Export to Blogger, Joomla, WordPress and other CMS products wordpress themes No need to learn Photoshop, CSS, HTML or other technologies wordpress themes Fun and easy to use!

With Artisteer YOU immediately become a Web design expert, editing and slicing graphics, coding XHTML and CSS, and creating Web Design Templates, Joomla templates, Drupal themes,WordPress themes, DotNetNuke skins, and Blogger templates all in minutes, without Photoshop or Dreamweaver, and no technical skills.


That's the message from the web sponsor Artisteer. Interesting indeed, and really interesting .... The bottom line for the webdesigner who wants to make his own template, can rely on this software. This software is able to produce an interesting template design not only joomla, but also Drupal themes, WordPress themes, DotNetNuke skins, and Blogger templates in a matter of minutes depending on the modifications that we want. But the program is paid so that if we export the results will show a disturbing watermark visual result. So, how do I let her watermark does not appear? The logic is yes must buy .. ... But do not worry Boz, ... I've included "keymaker" so that it can be used forever home does not upgraded to a higher version. This blog software is the full version 2.3. Please download the software and its on the menu keymaker download this blog.


Mikrotik as Bridge

Mikrotik as Bridge

Mikrotik as Bridge is intended that the interface that leads to the Internet functioned as a Bridge (Bridge) for internet connection. With the Bridge is the traffict BW from Interface (ether1 or have your name change) will miss the Bridge. Based on the author's experience, by setting this Bridge to be more stable internet connection .. Here's how its settings ..


Open Winbox, Click Menu Bridge, click the + sign, apply, OK


Click the Port menu, Double Clik ether1, arrow down, select Bridge 1, Apply and OK


Results and Traffict BW Bridge configuration that is being used ...
keep try...
How can I make my blog load faster?

How can I make my blog load faster?

The speed at which your blog loads is critical to attracting more readers to your blog. If your blog takes a long time to load, many readers may leave your blog before they have the chance to read it. Here are a few tips and tricks that will help your blog load faster and attract more users:
Posts
Your blog's load time can be affected by the number of posts you display on your main page. You can easily edit the number of posts displayed of the main page from the Settings | Formatting tab. You can then select the number of posts you want to display on the main page. We recommend displaying 10 or fewer posts on the main page.


Third Party JavaScript and Links
For optimal blog load speed, we recommend using Google/Blogger widgets, JavaScipt and links. However, if you need to use third party JavaScipt and links, your blog will load much faster if you put all JavaScript at the bottom of your blog. If you have third party JavaScript and links in your sidebar, put them in at the bottom of the sidebar.
Images and Media
Learn even more ways Google products work together.
The more images, videos and other multi-media you have on your blog the longer it will take to load. However, images and other multimedia are important to attracting users to your blog, so it is important to optimize the load speed of your images and media. Here are a few tips to increase the load speed of your media:
• Decrease the size of your images or use thumbnails that link to the full-size image.
• If you use third party images, consider uploading them to Picasa Web Albums via the Blogger post editor.
• If you have a large number of images to display, you can upload all your images (from a vacation or event) to a Picasa Web Album and link to the album in your post or sidebar.
Other suggestions
• If you've added any custom CSS to your blog, make sure you put it at the top of the page.
• The most important content of your blog that catches readers attention should load the quickest. To help you identify which items are taking the longest to load you can use Stopwatch. To use Stopwatch, enter your blog's URL into the text box and click "Start StopWatch". Stopwatch will then open your blog in a frame and will record the time it takes for everything on your blog to load, including images, videos, widgets, etc. Take note of the items that take the longest to load and modify them appropriately using our suggestions.


Adding Live Traffic Tracking Tool to Blog

Want to know where are your visitor come from for live? If yes, you can add blog tool from http://feedjit.com. With web or blog tool from http://feedjit.com, you can know your visitor come from. Easy install to blog and without signup before, grab the code and add to your sidebar and you have a live tracking tool for free.

Below is the example widget from feedjit.com :


This is the steps to add widget Live Traffic Feed to your blog :


1. Login to blogger with your ID.
2. At the dashboard, click Layout.
3. Click Page Element tab.
4. Click Add a Page Element.
5. Click ADD TO BLOG for HTML/Javascript.
6. Copy and then paste the following code :


7. Click SAVE CHANGES button.
8. Done. Now you have a tool for tracking your visitor come from.


Now you have a tool to track your visitor.


Add Yahoo Mesenger to Blog


Do you know what is Yahoo! messenger? I sure you is surely knew it. Yahoo! messenger is one of yahoo.com service very popular in the world. Then what his relation with blog? some blogger wish to be in his blog attached yahoo ! messenger icon , hence if him online in yahoo! messenger can in knowing by his blog visitor and also can easy to in contacting for chatting. If you ask to me, can yahoo! messenger icon add at blog? the answer is can, and not only that, we can choose icon what is will add. The choice is differentiated in 10 choice, you remain to choose style ID which which is compatible according to your :

This is the style ID of yahoo! messenger icon :


Allright, to placed the yahoo! messenger icon just place this code at your sidebar :


For example. If your yahoo ID is bapabadut@yahoo.com, your ID is bapabadut, So the code for yahoo! messenger icon with choice Style ID 9 is as follows :

Now, how to place the code to your blog. Follow the teps :
  1. Login to blogger with your ID.
  2. After entering the dasboard page , click Layout. Please saw the picture :
  3. Click at Page Element tab. See the picture below :
  4. Click at Add a Page element.
  5. After emerging pop up window , click add to blog button for the things HTML/JavaScript. See the picture following :
  6. Copy and paste the code below into available column :
  7.   Change YOURID with your yahoo ID and StyleID with number of your choice.
  8.   Click Save
  9. Finish. Please see the result.

If you still comfused with step above, i have the easy way to do this. Just click the button below, login to your blog and the code will add to your blog automatically, please Change YOURID with your yahoo ID and StyleID with number of your choice:


Enjoy with your yahoo! messenger icon. see you at may next post.

Introduction to Joomla

“Joomla! is one of the most powerful Open Source Content Management Systems on the planet. It is used all over the world for everything from simple web sites to complex corporate applications. Joomla!
is easy to install, simple to manage, and reliable.” –www.joomla.org

a. Content Management System
As a first step you should first understand what a CMS or Content Management System. Do the same with the HTML editor software such as Microsoft FrontPage, Dreamweaver, or even a Notepad?As we know, Conte nt is one pulse of the life of a website. No content can be ascertained there is no website. A well managed website will always try to show the latest content for its visitors.Then what is dim aksud with actual content?
Basically the content is a unit of information used to set up a page on the website.Can consist of anything; text, images, video, sound, and so forth.Of the existing content before, and then arranged in such a way so as to form a website. To facilitate the work, often times the rules and work processes were made between a webmaster who pay more attention to the technical side and the appearance of the website with a writer / editor who contributes content to the website. In other words, management of content to be displayed. Neither the webmaster norwriter / editor can create, edit, organize and publish a content in the framework / system that has been prepared in advance.Framework or system, where content is placed facilitate 'paraphernalia' needed to maintain consistency of manufacture process is s pages on the website by e fisien and effective.If all the above information we merge into one, it can be concluded, CMS is a system that facilitates the process of creating a dynamic website rich in content, to provide convenience to the author / editor to add, update and remove content without any direct intervention from webmaster. A CMS will distinguish Conte nt of design, maintains consistency in appearance and facilitate the utilization of content for various purposes. By storingdata in one place, to control access rights and workflow enlarge the user the opportunity to participate in the development of your website.b. CMS Joo MLA [www.joomla.org]Joomla is one of hundreds of free CMS is available on the Internet that has a large number of users. Ease of content regulation, the support on the Internet that much, plugins are abundant; an advantage that makes Joomla CMS Joomla attracted many people.In Joomla, each page of the website contains various blocks of content, this block is also called position. You set the layout for pages with a template, including the placement of blocks on many web pages, fonts, colors, and backgrounds. Then you place the various modules in a block. And lastly you add content and display on the main page of your website.2. Pre Installation Joomla CMSa. The applications that you need1) Package AMP (Apache, MySQL, and PHP): one of which is already integrated XAMPP AMP inside and save computer resources than the AMP install one by one.2) CMS Joomla version 1.5.33) Notepad, freeware for editing programming languages. Alternative: Wordpad, Editplus, Macromedia Dreamweaver or PHP editor.4) 7zip, a powerful freeware compression program. Alternative: WinZip or WinRar5) Internet browser, eg Internet Explorer or Opera or Firefox.b. AMP package installation (XAMPP)AMP package installation on your computer (before you upload to the Internet) is required to run the CMS Joomla.Make sure MySQL and Apache is already active (Running)To test access to the internet browser type localhost.Furthermore, files and folders on your web aka n placed in: C: \ ProgramFiles \ xampp \ htdocs3. Installing Joomla CMSa. Extract the package Joomla [Joomla_1.0.10.zip] to the folder C: \ Program Files \ xampp \ htdocsb. Rename the folder extraction results with the name you want. Suppose webmakananc. Run your Internet browser, access: localhost / webmakanan. So installation of Joomla CMS made via internet browser.d. Pre-installation check: make sure each item is marked in green. Then click Next.e. License: Click Nextf. DatabaseStep 1: Fill in a custom database configuration that you used.g. FTP Configuration: Click Nexth. ConfigurationStep 2: Fill in the name of your website on the field Si te nameSuppose Aneka Food.Step 3: Fill in Your E-mail field with your email and password fields with the Admin Passwordyou want.Step 4: As a beginner, do not forget to click "Install Sample Data" which will bechanged to "Sample Data Installed Succesfully"Then kilk Nexti. FinishStep 5: Remove the [installation] on your web folder[C: \ Program Files \ xampp \ htdocs \ webmakanan \]Step 6: click Admin to see the web admin page. Or by accessinglocalhost / webmakanan / administratorStep 7: Click on Site to see the front page of your new web. Or by accessinglocalhost / webmakanan.Footnote:On the Joomla CMS web page is divided into two parts, namely pages Backend and Frontend.Backend admin page is a page that is used to perform all configurationYour web. Access: localhost / webmakanan / administratorFrontend page is the page that will appear and be viewable by all visitors of your website. Access: localhost / webmakanan4. Joomla Content ManagementAfter you install the CMS Joomla, you can begin to be working with content. Joomla version currently has a static hierarchy of content: you have to divide the content into three hierarchies, no more, no less. Three hierarchy are: Sections, Categories, and Content.Sections such as a large container that contains all the categories. Categorie s is a smaller container and the contained content. All text and images that appear on web pages is content. You can not create content without having sections and categories.For example, we'll create a web lab. Hierarchy as follows:Section: FoodSection: PastriesCategory:Category:Traditional FoodZwiebackModern FoodWet CakeEveryday FoodPuddingSection: BeveragesCategory:Traditional DrinksModern Drinksa. To manage all web configuration, including changing the hierarchy of content, into the Joomla administrator page (localhost / workshops / administrator).b. Enter your username and password.Create SectionClick on the menu or the icon to add or edit sectionThis will take you to the layer section managerClick the link to edit an existing sectionClick the New icon tocreate a new section
By default, Joomla've installed a few sections (as well as the category and content).a. Click a link to edit the existing links. Suppose a link About Joomla!b. Enter the Title field and Alias: Foodc. Click the Save icon to save changes and return to the Section Manager.NB: Icon Apply to save changes and return to the page Section Editor.Icon Close to cancel changes.[.:: Exercise::. ] Make 2 other section by editing an existing section (News andFAQs), namely Drinks and PastriesFinal Results:NB: To return to the beginning of the administrator page, click the Site menu -> Control Panel.
Create CategoryClick on the menu or the icon to add or edit a categoryThis will take you to the Category Manager screen.Click to edit an existing categoryClick the New icon to create a new categorya. Click the New icon to create a new category.b. Enter the Title field and Alias: Traditional Foodc. Select Section: Foodd. Click the Save icon to save changes and return to the Section Manager.NB: Icon Apply to save changes and return to the page Section Editor.Icon Close to cancel changes.[.:: Exercise::. ] Make seven other category and adjust with that category as in the example, by editing an existing category and to unpublish a category that is not required.Final Results:Create Content ItemThere are several ways to create content:You can use one of the options for accessing items contenWe will use the Content menu option -> Article ManagerClick the icon for content published can be seen by web visitorsClick on the content title to edit existing content Click the icon to frontpagedisplay on the front page of the web column order and the save button to set the order-sequence contentClick the New icon to create new contentabcde Textf g ha. Fill in Title fieldb. If you want to show content on the web, select the option Yes, If the content you want displayed on the front page of the web, select the option Yesc. Select Sectiond. Select Categorye. Type or insert an article into Textf. Image Button is used to insert imagesTo take a picture on the computer, b Rowse files -> Start Upload -> Select the image in a row of pictures -> click Insertg. Pag ebreak button is used to continue the text to the next pageh. Read more ... button is used to cut a long article.[.:: Exercise::. ]Fill content in the category: [Content can be retrieved on the Internet]Traditional Food: Rice UdukTraditional Drinks: BajigurChicken SatayCendol BandungAyam oporModern Drink: Banana MilkshakeModern Foods: Chicken Ste akPastries: NastarSpaghettiKastengleEveryday Food: Vegetable Jakarta AsemWet Cake: Prince AyuTempe BacemBowspritPudding: Pudding CaramelFruit PuddingChanging Views on the Front Page Contenta. Access Menu -> Main Menuc. Change the value of field # Leading # Intro,# Columns and # Linksd. Click the Save Iconb. On the Menu Item, click HomeFinal Results:Welcome to the FrontpageAyam opor<>Nastar<>Putri Ayu<>Caramel PuddingChicken Satay<><>More Articles ...Fruit PuddingBanana Milkshake«Start Prev 1 2 Next End»Create MenuAfter creating a structured content, then needed a link for the end user dapatmengakses desired information. To access it's content, users need a menu that contains links to access the desired content.Joomla CMS that has been installed, by default has installed some menus, namely the Main Menu, Other Menu, Top Menu, and User Menu. We can create your own menu or edit an existing one.Top MenuPlayMenuResourcesKeyExampleConceptsPagesUser MenuTo increase or decrease the menu: Menu -> Menu ManagerTo remove the menu, select menu and then click Delete iconTo add a menu, click the New icon[.:: Exercise::. ]1. Delete Example menus and menu Pag es Key Concepts2. Create menus: food (food) and cake (Cake)3. Edit menu Resources to drink (Drinks)

To add or subtract a link on the menu: click menu item in the Named MenuClick here to remove links,select the link and click Trash iconTo add a link, click the New iconArticles - Article layout: create a link to the article which we selectArticle Submission Layout: allow users to send / create the article. This only applies to writers and members.Category Blog Layout Category List Layout or: create a link to the categoryFront Page Blog Layout: create a link to the article with the status of front pagelooks setSection Blog layout or Section Layout: create a link to a section[.:: Exercise::. ]1. On MainMenu menu, Delete Menu Item 2, 3, 4, 5, 6, 7, 8 and 9. Create Profiles itemwith an option to Articles - Article Layout. Before making the item, Buatla h article with the following profile:The final result:2. In usermenu menu, change the name of the item by name Submit an Article Submit Article,Your Details rename the item with the name My Details andSubmit an item to delete a Web Link.3. On the topmenu menu items for menu Story of This Web with an option to Articles - Article Layout (Make advance their ma sing his article.) Thendeleting items that are not needed.4. On the drinks menu for menu items with options Traditional Articles - Category Blog Layout menu item with option Modern Articles - Category List Layout. Then delete the items that are not needed.5. On the food menu for Traditional and Modern items menu with the option of Articles - Category Blog Layout menu item with an optional side dishes Articles - Category List Layout. Then delete the items that are not needed.6. On the menu for menu items Bas cake ah and Dry with options Articles - Category Blog Layout menu item option Pudding with Articles - Category List Layout. Then delete the items that are not needed.In order for the menu to appear in the page web frontend:1. Access menu Extentions -> Module ManagerOn the making of the previous manager menu, edit from the menu Menu Beverage Resources,then in the module manager does not have m odule drinks. Therefore, change the moduleSed adi Resources Beverages.2. Arrange the order of the menu so that it looks like the picture next to Adjust Display Joomla TemplatesTemplates can be analogous to such "themes" on the Microsoft Windows OS, so that is responsible in your web interface. In the template there is usually an index.php file that lis defining the general view of all web pages and css files(Cascading style sheets) which defines the format of web pages.1. Access to the Template Manager page: Extensions -> Template Manager2. To preview the template to be used, point the mouse over a link template.3. To use the template you want, select a template then click the Default icon.4. To use a different template on a particular page, click the template name, then on assignment menu select Select List from the menu then select the template that will differentiate it.ModulesIt is plug-ins that appear in front-end web. Used as a bridge betweenComponent and Joomla. You need a Module to him that the components of a ktifkanselected. Examples of modules such as: facilities Login Form, Search, Pools etc.1. Access to the Module Manager page: Extensions -> Module Manager2. To use the module you want, activate the enable status.ComponentsPlug-ins that are in the back-end web. One of its functions, namely to set the configuration of the module. Misalknya make a list of questions on the module Pools.1. Access to Components: Components -> Select the destination component2. Each component has a setting's and different functions.PluginsThe plugin also called Mambots, integrated with the content, so add it fe ature of content. The most obvious example is the editor to create a content, so the content can be made like a Microsoft Word editor with WYSIWYG display. It was the MCE mambot Name Editor.1. Access to Components: Components -> Select the destination component2. To use the module you want, activate the enable status.LanguageIt is one of the plugins used to add the language on our website.1. Access to the page Lang uage Manager: Extensions -> Language Manager2. To activate, select the language to be activated, then click the Default buttonis on the top right corner.How to Install / Uninstall Modules, Plugins, Templates, Language and Components.1. Access to the Install / Uninstall: Extentions -> Install / Uninstall2. Browse file to install, then click on upload file & install3. To uninstall, go to the destination plugin which will then select uninstall.[.:: Exercise::. ]1. Install and use the template with Pizza.zip name as the default.2. Install and use the template with the name Frooty Fresh.zip as Assign to pageModern Drinks3. Install and use the module mod_vvisit_counter.zip adjust its settings.4. Install and use the module camp26_smoothgallery_J15x.zip set width and height settings with 800. Then go to:modules/mod_camp26_smoothgallery/images_smoothgallery /enter the picture (size 500x70) will be displayed and change the title to Our Gallery