How to Show Blogger Links,Widgets in HomePage Only or Post Page Only

How to Show Blogger Links,Widgets in HomePage Only or Post Page Only

This post explains how to show the Blogger widgets( like links,adsense ads,etc) on your blogspot blog Homepage Only or Post Page Only:

Usually, by default.. when we add a widget item like link units, profile, Archives, Adsense ads,Pictures,etc in Blogger blog , it will be displayed in every page of the blog including the homepage, Permalink pages,etc. As you can see, I installed many widgets in this blog in sidebars like Google ads, Donate Me button ,etc which will be displayed in all the pages of the blog.
But, what if you want to display a specific widget like a blog link,ads in only the homepage and not in the post pages and viceversa? If you want to do so, this tip will come in handy...

HOMEPAGE Only widgets,links in Blogger:

→ As usual, if you want to add a new widget/gadget to your blog, just Sign into Blogger dashboard » Layout » Add a Gadget
and select the type of gadget you need and Save the Changes.

Next, we have to add a small piece of code to that widget, so.. it only displays in the Homepage. Just go to Edit html and tick on the 'Expand Widget Templates'.
Notes: Normally, the widgets in the template view starts with this one


For example, The label widget looks something like this:


and html widget looks like:


and link list looks like this:


(If you want to know exactly what the widget id you need to change, just go to your blog and view the source code and find it.
In Firefox : View » Page Source
In IE : View » Source )

Just below that widget id link, You can see a b:includable tag like this..


At this point, most of the task is completed.. Just we have to add a small piece of code below that b:includable tag..

the code is


and the last thing is, we have to close that b:if tag. Just add this code before the closing tag of b:includable.
Like this:


So, the final code looks similar like the below screenshot:

That's it! and Don't forget to Save the Changes.
Now, your desired widget/gadget can only be visible in Homepage.

Showing in only Post Pages (Permalink pages):


This will allow you to show a specific widget in only the Post Pages and not in the Homepage.
Just follow the same tutorial above but replace this code.

with this one:


Showing Widgets on a Specific Blog Post url:


If you want to dispaly a specific widget on on a particular blog post, just simply follow the above tutorial, but replace this code:

with this one:


That's it!
Like this post or have any questions? Comment here..

Get Free One Way Backlinks to your site

Get Free One Way Backlinks to your site

One way backlinks are very critical to any website success. The more one way backlinks pointing to your site, the more your Google Pagerank and the more amount of traffic you will get. This should also increase your sales,etc.
But the thing is.. getting the right and quality one way backlinks from high pagerank sites is not an easy task, and in this article, we'll find out some of the best ways to get free one way backlinks:

1. Try to write as much quality content as you can... that will encourage the readers to link to your site. The more useful, informative content you post, the more likely people are to link it. But, this method can take a while to really pay off because like all the new websites, you don't get much traffic.

2. Write quality articles and submit them to top article directories like ezinearticles and goarticles. The advantage in this is, you'll not only get a backlink from high pagerank directories, but also you'll find that your articles are used on other people's sites with a backlink to your site.

3. Participate in forums,discussion boards that are related to your website's niche and add a link to your site in the signature. Make sure that you write quality posts, don't spam. This will also help you get some decent traffic to your site.

4. There is absolutely nothing wrong to get a backlink from a related blog post you decide to comment on. This is one of the effective way of one way link building especially if you comment often on blogs. Comment on blogs related to your niche with a link back to your site as your signature.. and Again, make sure you never spam.

5. Submit your site link to major, well known web directories. Getting listed in directories related to your site not only bring you tons of targetted traffic, but will also improve your search engine rankings. Some of the popular directories to get listed in are DMOZ directory and Yahoo directory. You can submit your link to both paid and free directories and they worth your time.

Resetter Canon IP 2770 "error number : 5200"

This time we will discuss Blink 13x Orange on the Canon iP2770. This incident may be quite confusing for who have never experienced it. OK just go to the scene ...


Early indications:
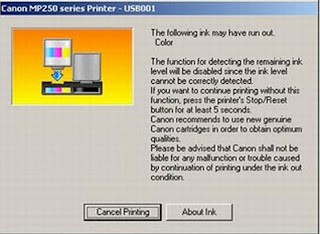
When the printer is turned on seems OK, but after the print command, it would appear Blink iP2770 Canon 13x Orange on this. Here's a picture which appears on the screen:


How to Cope with iP2770 Canon 13x Orange Blink:

1. If performed Blink 13x Orange with the picture above, means catrid color requires reset (having runout).

2. How: press the Resume button until the printer sounds a long process, then release.

3. If an Orange Blink 13x, meaning black catridge also need a reset (having runout), and the picture is as follows:


4. Same way: press the Resume button until the printer sounds a long process, then release.

5. Done, printer iP 2770 distinguished Blink 13x Orange will return to normal.

This often happens when the cartridge runs out finished refilled and then installed again.

For "error number 5200"


There are two ways: manually or via software.

Manual:

1. The printer is turned off and plugged the power cord.
2. Press Resume button 2 seconds
then press the POWER button until the green light on (when pressing the POWER button, Resume button ... do not released first)
3. Then release the RESUME button, but do not release the POWER button.
4. While the POWER button is still depressed, press the Resume button 5 times. Led will light turns green orange with the last glow orange. (Do not be mistaken 4x because the printer will die completely, but it is temporary too) Then ...
5. Release both buttons simultaneously.
6. Led will blink briefly and then will glow GREEN.
7. Press the POWER button, then the printer will die.
8. Press the POWER button again then the printer will flash and ... IP2770 Printer is ready for use.


Software:

1. Prepare 2 blank paper in the printer
2. In the menu "Clear Ink Counter" click "Play" and "Platen"
3. Click Test Print ... Done.

Location resetter software is below.

Good luck ...


User Manager Mikrotik


Mikrotik User Manager is a management system that can be used to manage users as follows:

1. HotSpot users
2. PPP (PPTP / PPPoE) users
3. DHCP users
4. Wireless users
5. RouterOS users.

This paper reviewed some of the User Manager for hotspot users. Previous hotspot and dhcp server package should have installed / enabled and configured prior to Mikrotik RouterOS. The assumption in this paper consists of a WLAN RouterOS and 1 ether. Ether as an interface that is connected to the internet while the wlan as an interface that connects to a hotspot client.Ip 192.168.0.40 ether and wlan 1 with ip 172.16.0.1/24. The steps are as follows:

1. Set the DHCP server on interface wlan1 (Set DHCP server on the previous posts).
2. Set Hostpot
/ Ip hotspot profile set hsprof1 use-radius = yes
3. Set the Radius Client for the User Manager to handle hotspots
/ Radius add service = hotspot address = 172.16.0.1 secret = 123 456
For the record first authenticate hotspot users will read on the database / ip hotspot user print. Remove the data in this directory for authentication on radius.

4. Install the User Manager

- Open system Winbox or packages from terminal

/ System / packages / print
- If no user package manager to install first. Because the user-manager is a separate package from the router os MT. Make sure the outer version of the same OS user version of the package manager. For example if we os router 2.9.50 then user-manager package should also be 2.9.50.
Download from http://www.mikrotik.com/download.html, select one user-manager package from the package zip-2.9.x.npk
- Upload via FTP program to Mikrotik Server
- Reboot Mikrotik Server
- Check system, packages such as No. 1, if the user's active managers have not turned on first and then reboot. If you have active
- Open http://192.168.0.40/userman
- If it can open the user manager login page, it means the user manager is already active.

5. Create a User Manager On behalf of Subscriber
/ Tool user-manager customer add login = "admin" password = 123 permissions = owner
6. Create Hotspot Router
/ Tool user-manager router add subscriber = admin ip-address = 172.16.0.1 shared-secret = 123 456
7. Create a User to Hotspot
/ Tool user-manager user add username = rio password = 123 dawn subscriber = admin

Please try to conn hotspot with a laptop and User Manager can be accessed via http://192.168.0.40/userman. The menus contained there in, among others, login status, add users, delete users, log and others. Such complete http://wiki.mikrotik.com/wiki/User_Manager/Customer_page

Website translator with flag countries

Blog Tips and Trick will discuss about how to install the Translator widget complete with a picture of the flag of each country. Probably most of the bloggers already know how to make or install this Translator widget. but what of the bloggers is a beginner like me, maybe some of the bloggers is a beginner like me still need tips like this. I think this widget is very important also to be installed on the blog page. but can to decorate the blog itself will also be extremely helpful for the visitors. especially for visitors from overseas who are not familiar with the language used on our blog. for the appearance of the widget is something like the image below.


Translator widget that you see as in the example picture above, the form will display its flag march elongated when we put it in part as the header, navbar and the like. because forms appearance of the widget itself will follow the hall from where the widget itself. for example, this widget you put on the side bar of your blog. the form of this widget will not elongate, but will form part of the width square. depending the side bar.

Without the need to talk again swapped, for those of you who are interested in installing the widget translator plus 34 this flag. way is as follows.

1. You login to blogger, then go into the menu layout / layout>> page element.
2. Add a new gadget by clicking the add a gadget by selecting the gadget HTML / javascript.
3. The next step is, you copy all existing code below.